Showing posts with label Blogspot Tutorial. Show all posts

5 Easy Tips to Become a Successful Blogger

I have seen in past that many people just start blogging on anything without a planning and ends with nothing. There is no success without proper planning until you are lucky enough. Here are few points I observed while writing for many years. These points should help new bloggers to do well in the field of blogging.
  • What's your interest?

    This is the very first question you should ask to yourself while going to start writing. The best output will come with the subject you are most interested with. You will be able to do justice with the blog if you write about your interest. Blogging is not an easy job, you need to dig into it to get the best out of it. If something is of your interest, you will dig into it deeper and deeper and that will help you to become good in writing about it.
  • What can you give to your readers?

    That's another very important question you should ask to yourself while entering into blogging. Readers visiting to your blog will be looking for something to take it with them. It could be a nice article, a nice tip, something new or interesting to download. You should always think of giving something to your readers. Each time you are going to write something, just think for a second that what I can give to my readers. This will help building a regular interest between your blog and blog readers.
  • Can your writing create interest among readers?

    That's another point of concern while writing. You should focus on developing interest among your readers towards your blog. This helps in building long lasting relation between blog and its readers. If you are not able to bring interest to your readers, they will not come back to your blog. Revisit to your blog by any reader will depend on how well your writing is. With good writing you can indirectly force them to revisit your blog and they will happily revisit your blog if they found it interesting.
  • Are you learning everyday?

    So you are all set for writing, you did some research about your interest, you know that you can give interesting writing to your readers. Now it’s time for learning. Yes, in every field you will find many successful people who has made his fortune with their sincere efforts, they have given something to the community and people know them for what they do. Your job is to learn the success mantras from such people every single day. More you learn, more you can offer to your readers. Learning is very important for reaching to top in your field.
  • Are you focusing on your objectives?

    I am sure many of us have some objectives associated with the blogging. Some of us just write because writing is their interest and they just want to share good/bad things to rest of the world. There are people who has clear objective in their mind with respect to their blog. You have to focus more and more on your objectives with every other post you make on your blog. Clear focus will help you to achieve your objectives at the earliest.
You too can become a successful blogger. Just put sincere efforts towards your blog, don't try to make fool to your visitors. Provide the things what they are actually looking for. Build a never lasting relation with your readers.

Adding an Image Beside Post Title

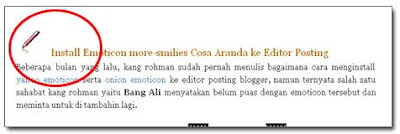
Don’t you want your blog look beauty? Maybe you can add several accessories. One of them is adding a small image beside post title, for example : please take a look the image below :

post title

How to adding a small image at the post title? here is the steps.

Step #1

You must have a small image image, for example like this :

my pencil

Step #2

Upload your small image to image hosting. For example : you can upload your image to blogger, Yahoo geocities, Google pages, or another free image hosting. If you has been uploading your image, please get the image code. for example : I'm has been upload an image to Blogger and the image code is :

https://blogger.googleusercontent.com/img/b/R29vZ2xl/AVvXsEhKJ8N7GtsMv9Cz8LbablL6Yn3w3jwYKoAeOOYdDrzJu40OkEzIDJQoLRVXB1dhjWXXCIyT_CRf1yasowjDGd3pahFzCeKjMxEe1d5pYY1Im_KqV5cpGU-Sz8hUNDyGd4nzVUhRFADFvps/s400/mypencil.jpg

So that the picture can appear at your blog, you must create the code like this :


And the image will appear like this :


Step #3

Add the image code to your template code. Here are the steps to add image code to your blog.


Or, do you still using old (classic) template? Never mind, bellow is the steps adding image code to classic template :


  1. Login to blogger with your ID.
  2. At the dashboard page, click Template.
  3. Click Edit HTML.
  4. Back up your template code (important!).
  5. Find this code :


  6. Replace your image code beside above code :


  7. Click Save Settings button.
  8. Done. Now your every post title will appear with your small image.


This is for new blogger template (beta template) :


  • Login to Blogger with your ID.

  • At the dashboard page, click Layout.

  • Click Edit HTML.

  • Back Up your template code (important!).

  • Please mark the little box beside Expand Widget Template. Wait for a moment


    expand-widget.png


  • Go to your template code, and find the code like this :


  • Add your image code like this :


  • Click SAVE TEMPLATE button.

  • Done. Now your every post title will appear with your small image

  • Adding Live Traffic Tracking Tool to Blog

    Want to know where are your visitor come from for live? If yes, you can add blog tool from http://feedjit.com. With web or blog tool from http://feedjit.com, you can know your visitor come from. Easy install to blog and without signup before, grab the code and add to your sidebar and you have a live tracking  tool for free.

    Below is the example widget from feedjit.com :

    <a href="http://feedjit.com/">Feedjit Live Blog Stats</a>


    This is the steps to add widget Live Traffic Feed to your blog :


    1. Login to blogger with your ID.
    2. At the dashboard, click Layout.
    3. Click Page Element tab.
    4. Click Add a Page Element.
    5. Click ADD TO BLOG for HTML/Javascript.
    6. Copy and then paste the following code :


    7. Click SAVE CHANGES button.
    8. Done. Now you have a tool for tracking your visitor come from.


    Now you have a tool to track your visitor.

    Free SEO ebook : Search Engine Optimization made easy

    free SEO ebook Want to get 1 top ranking at Google Search? Need ton traffic to your site? Optimize your site or blog. Don't know what should be do with your blog? Download this SEO e-book and read how to optimize your blog. The creator of this free e-book is Brad Callen. I'm loving this e-book because very simple but complete, good tips and trick. So, don't waiting untill tomorow, go a head to download this e-book. File size to download is only 1.66 MB. Please click at the image button :


    download here!

    Blogger Archives Dropdown Menu at Classic Template

    Hi every body! Today I'm checking my site meter and I'm found one of my visitor come to here with keyword "blogger archives dropdown menu classic template". I think he he must be felt disappointed, because didn't find this tutorial. 

    Are you still using classic template? Want to create your archives with drop down menu like this :


    Allright, this is some  steps to create archives drop down menu at classic template :


    1. Login to blogger with your ID.
    2. At the dashborad, click Template.
    3. Click Edit HTML tab.
    4. Don't forget to backing up your template before you editing your template (important!).
    5. Go to your sidebar code and find this code :


      <$BlogArchiveName$>

    6. Delete the above code and replace with this code :


    7. Click SAVE CHANGES button.
    8. Done. Now your archives will be placed at the drop down menu.


    For customize the width of drop down menu, please changing the value (red mark) with the number would you want.

    Have a nice  blogging.

    Free Tool : HTML Color v1.4

    HTML color V.1.4 Do you a web designer, blog designer, or hobby to edit your blog template? Maybe you need this tool. The name of this tool is HTML Color v1.4, with HTML Color V1.4 you can get HTML color code with easy method because HTML color v1.4 can record the color from image at your monitor, over you mouse computer at the area of your monitor and HTML color v1.4 will give you the HTML code.

    This tool is free tool, i'm has been use this tool from a long time ago to help for design my free blog template. No need install, run only. Download file is 184 KB. Want to try this tool, please click at the link below :


    download here!

    How to Adding a Photo To Blogger


    Several days ago I have checking my site meter to check my blog visitor where is come from and I found one of my blog visitor is come from Google search engine with keyword How to add photo to blogger, and I think he or she felt disappointed because he or she cannot found tutorial about this at my blog. For the reason, now I will post about How to adding Photo at blogger.

    Below are the steps to adding a photo to Blogger :


    1. Login to Blogger with your ID.
    2. At the dashboard page, click at Edit Profile.
    3. Go to lower side and find Photograph.
    4. Please mark at the radio button for from your computer.
    5. Click Browse.. button and then choose your photo would upload to Blogger.
    6. If uploading photo is done, go to lower page.
    7. Click Save Profile button.
    8. Done. Now your Profile will show with your photo.

    Split header column became two column

    Tomorrow night, one of my blog visitors has been ask to me how to insert search engine at the header blog? Hmmmm... All right... I try to answer this question. To inserting a search engine or everything at the header column, you must split your header column became 2 or 3 column. For example I'm has been split my header column became 2 column.

    Much technique to split header column, however I will show you my technique at my free template magazine template 1, so before you exercise to split header column please download template here! And then please create a new blog for practice.

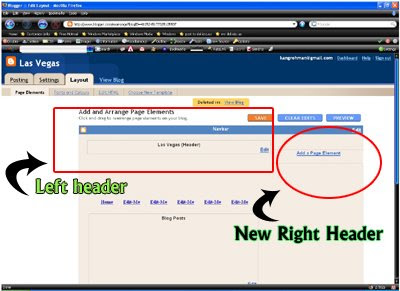
    Are you ready to do some action with me? All right.. follow these steps. Go to your page element, and you will find template structure like this :


    page element


    Now we will change the header column become 2 header columns. Click Edit HTML tab, go to your template code and find the code like this :


    /* Header
    ===================================
    */
    #header-wrapper {
    width:900px;
    margin:0 auto 0px;
    background:$bgheadercolor url(http://ahom24.googlepages.com/magazine_01.jpg) no-repeat top center;
    height:190px;
    }

    #header-inner {
    width:900px;
    background-position: center;
    margin-$startSide: auto;
    margin-$endSide: auto;
    }

    #header {
    margin: 0px;
    text-align: left;
    color:$pagetitlecolor;
    }

    Delete above code and replace with this code ;


    /* Header
    ===================================
    */

    #header-wrapper {
    width:900px;
    margin:0 auto 0px;
    background:$bgheadercolor url(http://ahom24.googlepages.com/magazine_01.jpg) no-repeat top center;
    height:190px;
    }

    #head-inner {
    width:600px;
    background-position: left;
    margin-left: auto;
    margin-right: auto;
    float:left;
    }

    #header {
    margin: 0px;
    text-align: left;
    color:#ffcc66;
    }

    #r_head{
    width:300px;
    float:left;
    padding-top:10px;
    }


    Go to lower side and find the code like this :


    Delete above code and replace with this code :


    Click SAVE CHANGES button and done.


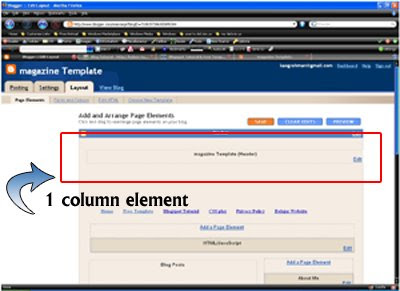
    Now click Page Elements tab and you will see your header column become 2 columns :


    new page element


    OK guys, now you can add anything at the new element in the right header.

    How to Making an animation photo

    Hi guys! did you want to making an animation photo but don't understand about animation software? don't worry about that, you can making an animation photo using online animation photo maker. That is very much site provides this service, one of them is http://www.slide.com. With this site you can make an animation photo very easy. First you must sign up at this site and then you can making much animation photos for free of charge. Still comfused how to make an animation photo at slide.com, please following the steps below :


    1. Please check out http://www.slide.com.
    2. First you must registered at slide.com.
    3. Click at Sign up (this is free).
    4. Insert your email address and password would you want.
    5. Then click Sign up button, and then automatically sign in to your account.
    6. Next step is making animation photo.
    7. Click Style for choosing your animation style.
    8. Click Skin for choosing your animation skin.
    9. Click Size for choosing your animation size.
    10. Click Select Image button, and then insert your photo or image file.
    11. Click Upload button for uploading your photos or images.
    12. If uploading is done, click Save button.
    13. Copy the HTML Code that given, and then paste at notepad or another text editor.
    14. Click Log Out to exit from slide.com. Close your browser page if you want.
    15. Done. Next step is inserting your animation photo to your blog.


    Now you can add your animation photo code to your blog, please following the steps :

    1. Login to blogger with your ID.
    2. At the dasboard page , click Layout.
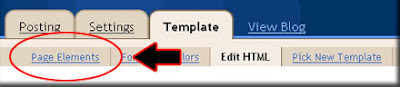
    3. Click at Page Element tab. See the picture below :
    4. page element
    5. Click at Add a Page element.
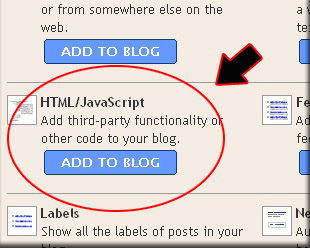
    6. After emerging pop up window , Klik add to blog button for the things HTML/JavaScript. See the picture following :
    7. javascript
    8. Open your animation photo code, copy and then paste into available column.
    9. Click   save changes   
    10. Done. Please see the result.

    How to Making an animation photo

    Hi guys! did you want to making an animation photo but don't understand about animation software? don't worry about that, you can making an animation photo using online animation photo maker. That is very much site provides this service, one of them is http://www.slide.com. With this site you can make an animation photo very easy. First you must sign up at this site and then you can making much animation photos for free of charge. Still comfused how to make an animation photo at slide.com, please following the steps below :


    1. Please check out http://www.slide.com.


    2. First you must registered at slide.com.


    3. Click at Sign up (this is free).


    4. Insert your email address and password would you want.


    5. Then click Sign up button, and then automatically sign in to your account.


    6. Next step is making animation photo.


    7. Click Style for choosing your animation style.


    8. Click Skin for choosing your animation skin.


    9. Click Size for choosing your animation size.


    10. Click Select Image button, and then insert your photo or image file.


    11. Click Upload button for uploading your photos or images.


    12. If uploading is done, click Save button.


    13. Copy the HTML Code that given, and then paste at notepad or another text editor.


    14. Click Log Out to exit from slide.com. Close your browser page if you want.


    15. Done. Next step is inserting your animation photo to your blog.


    Now you can add your animation photo code to your blog, please following the steps :


    1. Login to blogger with your ID.


    2. At the dasboard page , click Layout.


    3. Click at Page Element tab. See the picture below :


    page element


    4. Click at Add a Page element.


    5. After emerging pop up window , Klik add to blog button for the things HTML/JavaScript. See the picture following :


    javascript


    6. Open your animation photo code, copy and then paste into available column.


    7. Click save changes


    8. Done. Please see the result.

    Make a D'tree Menu at Blog

    Make a D'tree Menu at Blog

    d'tee menu
    Did you ever seen Window Explorer? At Window Explorer have a beauty menu likely my left banner. Did you know, you can make that menu at your blog. For example, please checkout my example blog here!, this menu named D'tree menu.

    Feel interest to make this menu at your blog? here is the steps to make a d'tree menu :

    #Step 1

    1. Login to blogger with yuor ID.


    2. Click layout.


    3. Click Edit HTML tab.


    4. Click the Download full template link. Save your template (very important)


    5. Go to your template code, and find the code .


    6. Copy and then paste following code above of :


    7. Click Save Template button.


    8. Step 31 is done.


    #Step 2


    1. Click Page Elements.


    2. Click Add a Page Element to make a element.


    3. Choose for HTML/Javascript.


    4. Copy and paste the following code at the element :


    Open all | Close all


    5. Click SAVE CHANGES button.


    6. Done. Now you have a d'tree menu at your blog.

    How To Change the Width of Shout box / Guest Book

    How To Change the Width of Shout box / Guest Book

    Hi my dear friend, meet me again at my new tip for blogging. Several weeks ago, I had deactivated this blog and moved to my main blog here, however I have changed my mind. Now, I will publish my tutorial in English at this blog, so don't be hesitant to visit my blog.

    Today, somebody at my ShoutBox asks me a question “How to change the width of ShoutBox?” OK brother I will try to answer your question. Do you know how to create a ShoutBox? If you still don't know how to create a ShoutBox, please read this post. If you want to change the width or the height of your ShoutBox, you can set at your ShoutMix account. However, I have a simple method to do this. For example, I have a ShoutBox code like this :


    If you want to set the width or height of your ShoutBox, only change the value of width or height, for example, this is the original value:


    width="230"

    height="400"


    Change the number with would you want, example:

    width="300"

    height="450"


    So, your shoutbox code will be like this :


    The last step, don't forget to save your template. And it was done.

    Add Video From YouTube To Blog

    Somebody ask to me, how to show video from YouTube or other website to post page such as this post. If you want to show a Video from you tube, that is very easy. Only need I little action from you. This is the steps to show a Video from You Tube :

    Step #1


    1. Please Check out http://www.youtube.com


    2. Find your favorite video which you want to show


    3. Look at to right side. Find → Embed. See the image :


    4. Copy the code under embed. Paste at notepad or another text editor. Close youtube window if you want.


    Step #2


    1. Login to blogger with your ID.


    2. Click New Posting.


    3. Choose Edit HTML tab (don’t at Compose tab)


    4. Copy the code at the notepad (embed code) and paste at the column for posting.


    5. Click Publish Post button


    6. Done. Please see the results

    Make a marquee effect

    Make a marquee effect

    What is the marquee? Marquee is a HTML code to make an object can moving or walk. Marquee code is a popular code because many blogger using this code at them blog's. Marquee effect can make by using ... tag . However marquee just work if viewed at Internet explorer, if you looking at Firefox it's bad looking.


    The attribute which almost used is :

    BGCOLOR="color" → to manage background color of an object (teks, image, ..etc).

    DIRECTION="left/right/up/down" → to manage direction of the moving object .

    BEHAVIOR="scroll/slide/alternate" → to manage behavior of the moving object .

    Scroll → object moving scroll.

    Slide → object moving 1 time and then stop.

    Alternate → object moving from left to right and then return again.

    TITLE='message" → The title or message will emerge when the computer mouse at the marquee object.

    SCROLLMOUNT="number" → to manage the speed of marquee, ever greater of number is faster his speed.

    SCROLLDELAY="number" → to manage delay time, it's on second.

    LOOP="number|-1|infinite" → to manage sum of looping.

    WIDTH="number" → to manage width of marquee object, it's on pixel (px) or persen (%).

    So that clearer I will show the example :

    The example of marquee from direction :


    this is example of marquee, the text moving from rigt to the left


    the result :

    this is example of marquee, the text moving from rigt to the left


    Change the word "left" with other word what you want, there is : right, up, down.

    The example of marquee from behavior :


    this is example of marquee from behavior


    The result :

    this is example of marquee from behavior

    The example from marquee of text variation with background color.


    The example of marquee of text variation with background color.


    The result :


    The example of marquee of text variation with background color.


    There is differ various from marquee, namely when computer mouse is reside in the marquee area the object will stop and when computer mouse in re-shifting to the other place the object will moving again. To make this effect only adding a few code at the marquee code.

    For example, Please drop your computer mouse to the marquee area :


    Please drop your computer mouse to here and you will be see the effect


    The result :

    Please drop your computer mouse to here and you will be see the effect

    The example of marquee with links object :


    Rubrik Elektronik


    Blog kang Rohman


    UniQue Template


    CSS Library


    The result :


    Rubrik Elektronik

    Blog kang Rohman

    UniQue Template

    CSS Library


    Perhaps only that for example, please creat other various of marquee effect with your self. See you at may next post. Happy blogging!

    How to Remove the Number of Label

    Somebody ask to me, how how to remove teh number of label? allright, do you understand the meaning of the above question? please take a look at the following picture :


    Do you wish to eliminate the number at lable too? this is the steps :


    1. Login to blogger with your ID


    2. After entering the dashboard page , click Layout. Please saw the picture :


    3. Then click edit HTML tab. Please saw the picture :


    4. Click the Download full template link. Save your template:


    5. Please mark the little box beside Expand Widget Templates. Wait for a moment.


    6. Go to your template code, and find the code like this :


    ()


    7. If you was found the above code, please delete.


    8. Click Save Template button.


    9. Done. Please see the result.

    Add a Clock to Your Blog

    Add a Clock to Your Blog

    So that your blog see interesting and beautiful, you can add some blog accessories, one of them is by add a Clock. If you interesting to add a clock to your blog, you can get it for free at http://www.clocklink.com site. The example of clock from http://www.clocklink.com is like this :


    Feel interest to add a clock to your blog? please follow the steps :

    Step #1

    1. Please check out http://www.clocklink.com.


    2. Click at "Gallery" tab.


    3. Click at the categories of clock which you want, there is Analog, Animal, Animation, Count Down & Up, Dark Background, Digital, Holidays, Logo & Custom, Seasons, Sport, Transparent, and Wallpaper.


    4. If you have found the clock you wish, click at "View HTML tag" below of the clock.


    5. Click at "Accept" button.


    6. Choose the time which match with your zone beside "Timezone" text. Example : for west indonesia, choose GMT+7:00.


    7. Set the measure of the clock beside "Size" text.


    8. Copy the code and then paste at Notepad or other text editor. Save into your computer.


    9. Close your browser.


    Step #2

    1. Login to blogger with your ID.

    2. After entering the dasboard page , click Layout. Please see the picture :


    layout


    3. Click at Page Element tab. See the picture below :


    page element


    4. Click at Add a Page element.

    5. After emerging pop up window , Klik add to blog button for the things HTML/JavaScript. See the picture following :


    javascript


    6. Open your Clock code, copy and then paste into available column.


    7. Click save changes


    8. Done. Please see the result.


    Now you have had a Clock at your blog.

    If you enjoy this post please Digg It!

    Enjoy your beutiful clock. See you at my next tutorial. Happy blogging.

    Add Favicon to Your Blog URL Address

    Do you ever seen your blog URL? what do you see beside your blog URL? yea.. beside your blog URL address is a blogger icon, 


    The icon beside URL address named with Favicon ( favourite icon ). If you ask to me, do blogger icon can be changed with your icon or might be with your photo's? the answer is you can do that.


    How about the step to do that? this is the steps :


    1. First you must have an image, for example like this:
    2. After that, you must change your image to be icon. For do that, you can use favicon Generator, please check out http://www.favicongenerator.com
    3. Click at the "Browse..." button.
    4. Insert your image which will change into favicon.
    5. Click at "Generate Favicon!" button.
    6. After the process is complete, click at "Click Here to Download your favicon".
    7. Save into your computer.
    8. Next step is you must upload your Favicon to image hosting. For this step, you can read at this post!.
    9. Now I assume you have had the URL address of your favicon. For example, I have a favicon URL address like this :
    10. http://www.geocities.com/amn_tea/favicon.ico
    11. You must change the favicon URL address to be like this :
    12. http://www.geocities.com/amn_tea/favicon.ico"/>
    13. Next step is login to blogger with your ID.
    14. Click at "Layout".
    15. Click at "Edit HTML" tab.
    16. Click at "Download full template" link. Save your template into computer (importan !):
    17. Find the code :
    18. Place your "Favicon code" below of . For example :
    19. http://www.geocities.com/amn_tea/favicon.ico"/>
    20. Click "Save Template" button.
    21. Done. Now you have favicon at your blog URL addres.


    To see the result, please use Fire fox or Opera browser.

    If you enjoy this post please Digg It!

    Allright, I think this enought. Enjoy your new favicon.

    How to Make a Logo and Image Button

    If you are which have ever been skilled use graphical design program such as adobe photoshop, coreldraw and another program, make a logo is not a difficult work, and possible this tutorial not interesting to reading. However perhaps there are some from the readers is same with with me that is not expert at graphical design program, you can use the site provide this service. One of the sites which provide this service is http://www.cooltext.com.

    if you use service from cooltext.com, you'd be very easy to make a logo or image button, this is the steps :

    1. Please visit http://www.cooltext.com.
    2. For create a Logo, click at Logos tab.
    3. Click at the example logo style which you love.
    4. Write the text wishing in making the logo beside Logo Text. For example : Blog Tutorial.
    5. Write the measure of text in wishing beside Text Size. For example : 50.
    6. Click at the colourful icon beside Text Color to choose the color of text. Please choose the colour whict you want.
    7. Choose the format of image beside File Format. Better .JPG or .GIF
    8. Click at Render Logo button.
    9. Wait for a moment, your logo is processed.
    10. See the logo result, if you want to change the logo, click at Edit this Logo. If you want to download the logo, click at Download Image. Save into your computer.
    11. Done. Now you have had a Logo.


    If you want to make a Image Button, please following the above step, but don't choose logos, please choose buttons


    Allright, so that the logo can display at your blog, you must upload your logo to the Image Hosting. For upload an image to image hosting , you can read at this post. For example, I have had upload my logo to http://www.phtobucket and the image URL is :

    http://i162.photobucket.com/albums/t253/rohman24/logoblogtutorial.jpg

    To display this image URL, you only add a little code like this :

    Blog tutorial

    This is the result :
    Blog tutorial

    If you want to resize the image, just add the value of width and hight. For example :

    Blog tutorialwidth="130" height="40">


    This is the result :
    Blog tutorial

    If your logo want to make a link, you must have a link target. for example : I want to the logo linked to http://template-unik.blogspot.com. This is the code :

    Blog tutorial


    This is the result :
    Blog tutorial

    How about the Image Button, that is the same way with Logo. This is the example for image button with link :
    blog tutorial

    Where I place the above code? if you post, please at Edit HTML and if want to sidebar, please choose HTML/Javascript element.
    If you enjoy this post please Digg It!

    I think this is enought for this post. See you at my next tips. Happy blogging.

    How to Upload an Image to Image Hosting

    Hi brother/sister meet you again at my new tips. In this opportunity I will try to give you a tips about how to upload an image/picture to image hosting.

    if you have an image or picture in your computer and wish in presenting online on internet, hence you must upload that image to image hosting as the server. Free image hosting is very much, and the most popular is such as Yahoo Geocities, google page creator, image hack, photobucket, and etc. To upload an image to their server, first step is you must registered at that site.

    However, for this post i will only write how about an image/picture uploaded to Yahoo Geocities. First you must have an account at yahoo! Don't have a Yahoo! ID? Sign up here. Now I assume you have had an account in yahoo. For upload to Yahoo Geocities please follow the step below :


    1. Please login to Yahoo geocities with your ID.
    2. Click "Manage" tab at yahoo control panel.
    3. Click "Easy Upload"
    4. Click "Browse" button, insert image file at your computer and then click "Upload File". See the picture :
    5. If your upload has been succes will show a display, click at "File Manager"
    6. Right click at "View" link, then "Copy shoertcut", open your "Notepad" and then paste at notepad. That is your Image URL. See the picture (please click at the image for large image):
    7. Now you have had an image URL.


    How to display/show your image URL at your blog? allright this is the steps :

    Example, I have an image URL like this :

    http://www.geocities.com/amn_tea/blogtutorial.gif

    to display this URL, only make the code like this :


    Result :


    For good SEO (search engine optization), always use "Alt="..."" tag at every your image. With "Alt="..."" tag, if the mouse computer drop to the image, that is will appear the title of "Alt="..."". For example :

    alt="blog tutorial">

    Result, please drop your computer mouse to the image, that is will appear a title of the image:


    Do the image can be made to link? the answer is yes.

    For example, i will made a link from the above image to my other blog, the URL is http://template-unik.blogspot.com. This is the code :

    http://template-unik.blogspot.com">blog <span class=tutorial
    " border="0">

    Result, please drop your computer mouse to the image and then click, you will visit my other blog :


    If you do the step above, your page will be lost and will change with new page. If you want your page not be lost when the image link clicked, you must add "target="_blank"" at the code, example :

    target="_blank">blog tutorial

    Result, please drop your computer mouse to the image and then click, you will visit my other blog but this page will not be lost (open new page/window) :


    Remember. To do this tutorial, if you want to display the image at your post, you must at edit html, and if the image will show at sidebar, please choose "HTML/Javascript"

    If you enjoy this post please Digg It!

    For today I think is enought, see you at my other tips. happy blogging.

    Add Digg Button to Post Page

    Do you know Digg.com? I'm sure you know about digg.com, because digg.com is a most popular site in the world. With digg.com you can discover and share your blog content. So it's one of the way to increse your blog traffic. But I do not want to converse many hitting about digg.com, which I will focussed is the step of installing the digg button on your page post.


    With Digg button you can easy to submit your post with your self or with your visitor to digg.com. Feel interesred to add digg button to your blog? this the steps :


    1. Login to blogger with your ID
    2. After entering the dashboard page , click Layout.
    3. Then click edit HTML tab.
    4. Click the Download full template link. Save your template:
    5. Please mark the little box beside Expand Widget Templates. Wait for a moment.
    6. Go to your template code, and find the code like this :
    7. Delete the code above and alter with following code :
    8. style='float:right; margin-left:10px;'>
     

    Share

    My Blog List

    Search

    Followers

    Technology Copyright © 2009 Blogger Template Designed by Bie Blogger Template